Sunday, May 29, 2011

Final Word

I was quite pleased to hear that my idea was chosen in combination with another project for the end of year exhibition. We will have to work now to combine both ideas, taking the strongest parts of both to make a strong new concept to work with.

Finally this project is done! I have built the model of the exhibition space, burnt the CD, printed the book... I think I'm done now.

Thanks for reading!

Saturday, May 28, 2011

Costing

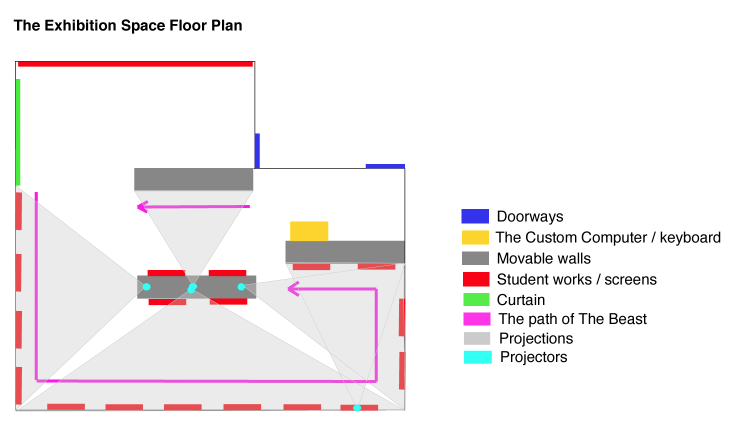
The exhibition space will be free for us to use. We will also have access to approximately 5 projectors and enough screens (either flatscreens or computers). However, if we need to use computers to display student works, these will need to be put on some sort of platform on the walls. In this case, we could easily mount wood on the walls to rest the computers on, allowing the creature to still climb over and under the works.

The projections themselves won’t cost any money.

The custom keyboard case will be very cheap as well and will be very easy to construct.

We can potentially use large sheets of paper to cover the surface of the greenscreen wall, but this won’t cost much either.

Here is a breakdown of all our potential costs:

Material

Price

Projections

$0

Exhibition Space costs (including seating, movable walls etc.)

$0

Screens

$0

5 projectors

$0

Platforms (potential)

$468 (Bunnings Warehouse Floating Shelf)

A1 Paper to cover greenscreen

$40 (art supply store, Doncaster)

Cardboard for custom keyboard

$20-50 depending on materials and solution chosen

If the floating shelves and the A1 paper is required, this project will cost approximately $560.

This makes the project very feasable. If we decide that we don’t need to have platforms or the A1 paper, this project will only cost about $20-$50 for the materials required to build the custom keyboard case.

The Custom Keyboard

This is the basic design of the custom keyboard:


A standard computer keyboard can be used with a simple cardboard custom cover built for it with six custom buttons. This is what the visitors use to control the emotions of the Beast. The custom built case will be built for the main purpose of holding the custom buttons, which will connect with particular buttons on the actual keyboard, which need to be triggered to set the emotion-changing keyboard events into place.

For example, the custom button showing a smiley face or a sun (representing happiness), can be pushed by the visitor. This custom button, when pressed, will in turn press down a keyboard button, for example, the letter “G” button, which can be programmed to set the “happy” animation into play.

As you can see, The custom buttons care built into the custom keyboard case and when pressed, will press the real keyboard buttons which will activate the code.

There is also room to put instructions on the right stide of the keyboard.

Monday, May 23, 2011

Exhibition Space

This is the design for the exhibition space -


As you can see from the above floor plan, the viewers can enter the exhibition space from two doors. However, I think it will be more appropriate for the visitors to enter through the door near the custom computer/keyboard so that they can have access to it. The rest of the exhibition space in the main room will then encourage viewers to walk the same route as the Beast.

In the smaller room, the student works will be displayed on the big screen. We can put chairs in here to allow viewers to sit.

The curtain will be pushed to the side in the smaller room. This is helpful because when a visitor presses a button on the custom computer and changes the Beast’s mood, the Beast will first finish his current loop, then “disappear behind the curtain” and then reappear in the new mood without any awkward transitions taking place.

The greenscreen wall on the left of the above floor plan can be made white with paper pasted on top of it if need be.

Sunday, May 22, 2011

Happy Walk-Cycle

Here are the clips for the happy walk-cycle. The first clip shows the different coloured limbs which helped with the animation and the red guide lines.

The clip below shows the animation in the environment of everything the creature touches. This is in yellow. Again, I think this will work better if the creature itself is in yellow too.

The last clip is the final animation with everything in yellow. I'm happy with this result.


Friday, May 20, 2011

Angry Walk-Cylce

Here are the clips for the angry walk-cycle. The first clip shows the different coloured limbs which help with the animation and the red lines which allow me to know where the floor is meant to be and to help with the 'bounce' in the walk-cycle.

The clip below it is the angry walk-cycle where the creature is black and the other elements are red. I think this works okay, but would work better if the beast was also red.

The last clip shows the final angry walk-cycle with the beast in all red. I think this works really well!


Thursday, May 19, 2011

Neutral Walk-Cycle

The clip below shows how the animation was done - with the limbs of the character different colours and red lines which act as guides. The grey squares represent the screens on which student works will be showing.


The clip below shows the final walk-cycle for the character in a neutral state of mind. His limbs have all been changed to black and the red guide lines have been deleted.